A speech pathologist came in yesterday with a cardboard cut-out flower and some communication/activity boards she had made for spring. She was having students use seeds and glue them on a flower and use colored cut-out petals for an activity. She asked if I had any ideas for a spinner that was switch-activated.
“Why don’t we make one right now!” I said. (It took about 20 minutes because I had everything already)
Materials:
Battery operated necklace fan
battery interruptor (see links to get one or make one below)
self-adhesive velcro dots or strips (both the latch and hook)
scissors
Sharpie pen and pencil
cardboard or card stock paper
notching file or a small round file
How we did it:
I grabbed a necklace fan that was battery operated I had saved in the closet for just such an occasion and we notched the slide lid on the bottom for the battery interruptor/switch cord, put batteries in and the interruptor. When we plugged the switch in, the switch made it go (We had to slide the on/off switch to “on” first and leave it there). Here is a
link to get interruptors ready to go for $10.95. You can make them yourself too with a solder gun, and some speaker wire and plugs from radio Shack.
pdf instructions here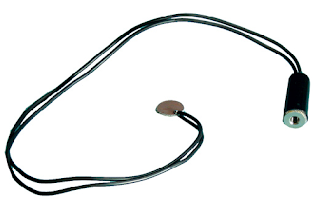
A battery interruptor
Next, I took the fan guard screen’s top half off to access the blades inside. I used scissors and cut off the fan blades so we could use the top of the fan as a mount for the spinner arrow. I used velcro dots and stuck a dot on the fan head that spins and the corresponding dot on a spinner arrow I cut out, then stuck them together, pressed the switch and…we had a spinner!’
Now the fun part came:
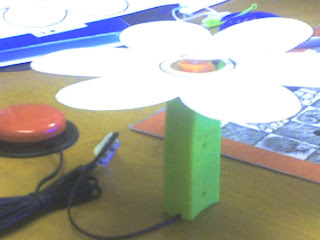
I took her cardboard flower cut-out and traced it on card stock. I cut it out and cut the center hole out so the spinner and fan blade head would go up through the center of the cut-out. I put velcro underneath, on the bottom fan guard and also the cut-out so it would stay. Now we had a flower spinner, themed to go with her activity.
She can now use boardmaker or other graphics, colors, numbers, etc. to make the spinner fit any activity. Other shapes could be: a pumpkin, shamrock, bug, heart, snowflake, etc. to fit other activities, or just a cardboard circle with divided sections and velcro dots to fasten any symbols you choose on.
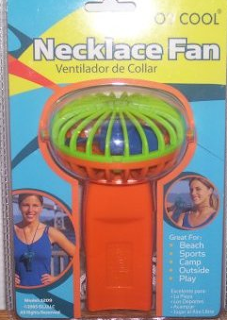 O2Cool Necklace Fan
1. The top is flat and facing straight up to put up through a cutout. Most fans are on the side or angle, making it hard to adapt it for a spinner.
2. It has a nice flat base so it can be switch-adapted and stand up without help. I have seen ones that have been mounted up inside a yogurt or cottage cheese container to hold them. This one might need a round cardboard foot under it to help it stand up better, but mine is staying up on its own.
Here is a snapshot of mine taken with my cell phone afterwards…